Showing posts with label Vue Infinite. Show all posts

Saturday, August 13, 2011

Create your own planet (using Celestia)

The theme of this first tutorial is how to produce image of a fictional planet of your own making. Personally I use two programs to do so: Celestia and Vue. Celestia was used to produce, among others, the 'satellite images' on my site. It allows you to explore the universe, and provides detailed images of just about any object in our solar system, shown with appropriate orbits, orbital speeds, etc. The program is driven by scripts that are completely open, meaning that anyone who wants to can change almost anything. The result of this is a lively community in which you will find all kinds of real rockets and artificial satellites, but also space ships and entire solar systems from science fiction. There is a 'motherlode' and a forum.


This tutorial aims at absolute beginners as far as Celestia is concerned, but you will need some experience with a suitable graphics program. At the very least you need to be able to paint, select areas and cut and paste them. Photoshop is an obvious candidate; I have used Paint Shop Pro in the past, and now also use Painter11. I am told GIMP is also good (and free...).


The planet Mars will be given a new surface, which, in the computer world, is a 'texture'. In its simplest form that is just a colour image, but additional trhcks include producing a 'bump map', allowing mountains or canyons to stick out or to be recessed, creating a more powerful 3D illusion. Another trick is adding a 'specular reflection map'. With it, areas such as seas and lakes will gleam when light falls on them, in contrast to duller areas such as land. Finally, planets can be draped in 'cloud maps', making them look like Earth.
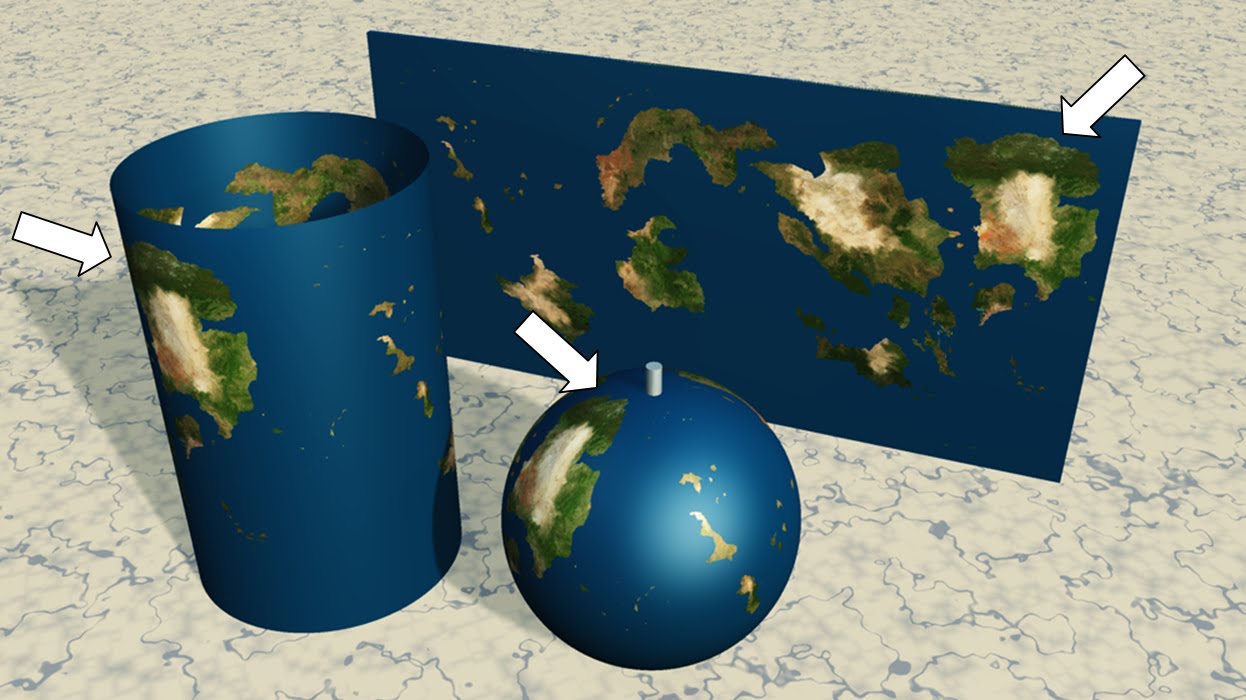


Click to enlarge; copyright Gert van Dijk


How do you design an interesting planet surface? Or, how do you draw the surface of a 3D sphere on a flat surface? By distorting it. Severely. The image above shows a sphere with a texture of the planet Furaha, along with a cylinder on which its surface is projected. Cutting the cylinder open produces the flat map in the back. Most distortion will occur around the poles, which is very visible in the image above. The arrows all point to the same part of the same continent. On the cylinder and the flat map that area looks much broader than it is on the sphere. The simplest way not get frustrated by polar distortion is to leave the poles featureless, achieved by filling it with sea.


The map above is twice as wide as it high; those are also the proportions used by Celestia, and they make good sense. The height of the map is the distance from the South to the North Pole across the surface, or half the circumference of the planet. Walking along the equator provides the entire circumference, ending up as the width of the map. This is about the simplest map projection there is, known as a 'Plate Carrée' projection. You should use sizes that are multiples of two, because Celestia wants you to. A good size for a blank map is an image of 1024x512 pixels. If ever you are ready for more, use 2048x1024 or multiples of that.


Click to enlarge; copyright Gert van Dijk


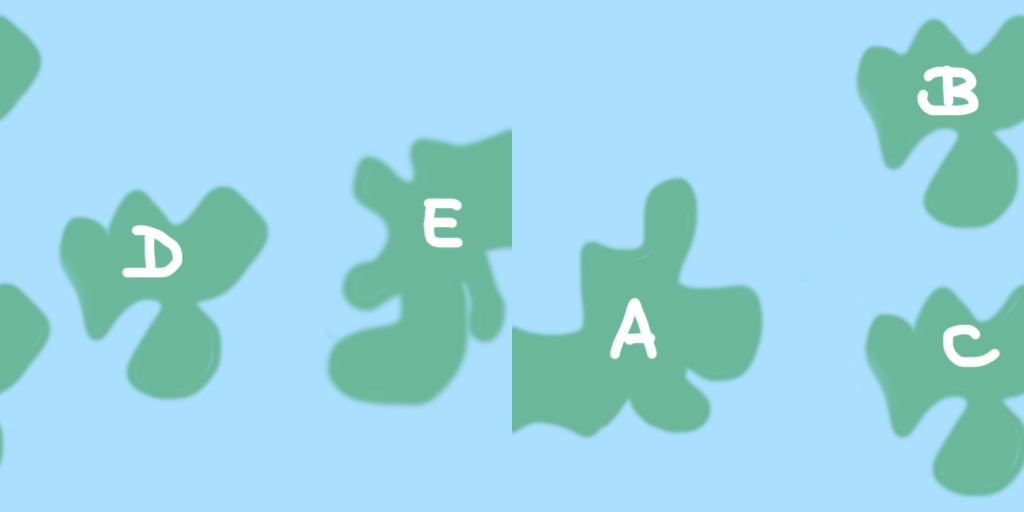
Here is a silly map of 1024x512 pixels with a few continents on it, labeled A to E. Note that B, C and D have the same shape. Let's cover Mars with it; you can download it from the above image, or make your own version (in which case it should be 1024x512 pixels!).


  1. Celestia should be on your computer. If not, download it and use it until you can at the very least find the planet Mars and get it into view.
  2. Close Celestia if it is open. Find the Celestia folder on your computer. Open it and locate the 'textures' folder. Within that is a 'medres' folder. It is filled with many planetary surfaces that you can study at will. Find the file 'mars.jpg' and have a look. It should be 1024x512 pixels. Save it, also in the 'medres' folder, but now as 'OLDmars.jpg' (in case you later want to replace your own planet with good old Mars).
  3. Now is the time to take either the silly image I provided or your own 1024x512 image. Save it in the Celestia medres folder under the name 'mars.jpg'. Don't use another size, don't use another name.
  4. Run Celestia and go to Mars. And there you are. Marvel and gloat.
Click to enlarge; copyright Gert van Dijk


You may note that there are some ridges and craters on your planet: those are the result of the bump map for Mars that is still in place. When you are ready marvelling it is time to stop gloating: the two sides do not match up. Continent A straddled the western edge of the map, and E the eastern one. Well, a map has edges, but a sphere hasn't. That simple fact tells you at the edges of the map are trouble areas. Remember that the flat map is a cylinder cut open, so the surface should be contiguous along the vertical seam. One way to do that is to use a featureless sea along the seam. But there is a better way. This boils down to cutting up the map in two halves: a western and an eastern one. Switch their positions, and the former edges now lie against one another at the centre of the image. Edit them to produce a nice continuous shape. How you cut the map into two halves depends on your graphics program. In Photoshop you can do the following (correct for CS5): Select Filter, then Other, then Offset; once there, check the box for 'wrap around' and fill in half the width of the image (which is 512) and press OK. That should do it.


Click to enlarge; copyright Gert van Dijk


Above are the results of first rearranging the squares and then editing the map. I chose to let the continents A and E fuse to form 'EA'. After you have worked on the centre of the map you can decide to revert the procedure and change the squares around again, also shown above. You can also decide not to bother, as both are equally correct.


There is a good chance that you will have noted that the continents B, C and D differed in shape on the globe, whereas they are the same on the map. The nearer the poles you get, the more pronounced the distortion is. It is extremely difficult to predict how a 2D shape will look like in 3D. The usual result is that shapes near poles tend to look pinched, i.e. many features will look like lines pointing to the pole, which is ugly and unrealistic. There are three solutions: as you may guess, the first is to fill the area with sea. The second is to muddle through: look at your latest version in Celestia and work on the flat map to correct pinching. Then save the latest effort as mars.jpg again, close Celestia, open it again as it otherwise does not refresh the map, and repeat. The third solution is the most elegant one, and requires that your graphics program can do a conversion from polar to rectangular coordinates as well as vice versa. Photoshop can do so (I learned this one from a tutorial on the Celestia forum). In Photoshop this transformation makes the rest of the map fuzzy, so it is best to use it with only part of your map:


- Select the top area of your map as above: the entire width, and roughly one quarter of the height.


- Copy this as a new image and jot down its size (for instance 1024x142, or 1024x199, etc). It should look like the one above.


- Transform this into a square of 1024x1024 pixels ('Image', then 'Image size', uncheck 'constrain proportions', change the vertical pixel size to 1024, OK).


- Go to: Filter; Effects; Distort; Polar; select 'rectangular to polar' and press 'OK'. This results in a new square image as if you are looking down at the pole. That is the top one of the two above. Edit it at will, resulting in something like the one above.

- When ready, all the steps should be reversed. First revert the polar distortion: go to Filter; Effects; Distort; Polar; select 'polar to rectangular' and press 'OK'

- Give the square its original rectangular size again, which you had jotted down (use the same route: image; image size, etc.)

- Select the entire rectangle and copy it to memory

- Go back to your world map and paste the edited polar area in your map in the right area at the top.

- If need be, merge layers so you can save it again as 'mars.jpg'


Click to enlarge; copyright Gert van Dijk


The map looks rather different now, and in Celestia there is no more polar pinching! For the south pole you can rotate the world map by 180 degrees so the south comes out on top.


If you can handle seams as well as prevent 'polar pinching', you are well on your way. I may need to do another tutorial on how to design suitable colour textures, bump maps and specular reflection maps. Do not forget that there is quite a bit of material on the Celestia Motherlode, on textures as well as on many other things.


Click to enlarge; copyright Gert van Dijk


Here is a picture made with Vue of the same globe. I added a bit of 'bump mapping' and some reflectivity. There is a free version of Vue 9 that hasn't got all all options, but you can definitely make images such as this one with it. Those who wish to experiment will find it here.


Click to enlarge; copyright Gert van Dijk


I prefer Celestia for imafes with a realistic astronomical view. For other illustrations Vue is nice; here is a model of Furaha with a colour map, bump mapping, with a grossly exaggerated height, and different reflectivity of sea and land areas.

Saturday, June 4, 2011

Its a bird, it's a plane, it's... a tetropter (tetropters IV)

The nice thing about computer animation is that it allows you to actually see thing that you could only dimly imagine beforehand. One image that has been sitting in my mind for many years is the following: you see a dusty plain, and a herd of handlebars (Latifrons imperator) come galloping in from the right hand side of the image in the distance, and then wheel towards the viewer as if they were performing a well-rehearsed cavalry manoeuvre. I can almost hear them too...

Unfortunately I do not see anyone spending a small fortune to make this a reality, so I will have to content myself with what I can do myself, with my PC, at home. Some visions therefore remain locked in my head, but a few more modest ones do find their way out. Making tetropter flight visible is something I thought I worked on for quite some time; today I can show you a near-final result. Near final, because nothing creative is ever truly finished. In this case, the camera should move, the animals should vibrate in rhythm with the wing beats, there should be more details, there should be motion blur, and there absolutely has to be blurring to mimic a limited depth of field and through that create the illusion of small size.

Still, what I can show you is the principle of the thing. It's not a movie, but an illustration of wing movement in slow motion. Tetropters have been described several times on my blog. A summary of the tasks involved in animating them is found here, and entries on their design and wing movement patterns are here, here and here. In short, they are radial flying animals, whose four wings can do a 'double clap and fling', invented by yours truly, and later also by other people in the flying robot business. By the way, the movement of tetropter wings is not all that different from the complex way in which Earth insects move their wings.


This is an animated scheme to show how it all works: the wings are planes that are warped as they cycle through their movement cycle, so their shape is different depending on were they are. Where they are is governed by rotations along the x-, y- and z-axes, and all these paths can be altered and edited. The Matlab programs that do all this in the end write lots of 'obj' files: those are files describing 3D shapes; one is produced for each wing for each frame of the cycle (there are usually 120 frames in a cycle). A script written in Python then loads in a scene containing a body shape without wings in Vue Infinite, adds the appropriate wings per frame and stores the images. These are then used to form an animation, and those are what you see here.
The 3D shapes of the wings consist of 1600 small triangles, which is more than enough to show supple movement. As they are they do not look like wings at all, but there is another trick to take care of that.


The trick in question is to add transparency and colour. The transparency mainly makes unintersting parts invisible, but it is also useful to make the wing itself partly transparent as here. To create the fly-like animal above (Bombilator musca) I used an image of a real insect wing found on the internet, and used that to create a transparency mask. All of a sudden, the boring rectangular 'wings' produced by the Matlab program take on a biological appearance. Please do not look too closely at the body of the animal: it is a simple shape cobbled together in Vue. As you can see the animal has four legs and two sets of eyes: upper ones, presumably to scan for danger, and lower ones, near the food gathering end at the bottom.


A bit of colour makes a lot of difference, so here is a farfalloid, resembling a butterfly in overall appearance (Farfallapter caeruleus). Indeed, I stole its wings from a real Earth butterfly, albeit with some warping and editing. Mind you, quite a bit is lost in the conversion process.

Click to enlarge; copyright Gert van Dijk

To show that, here is a still of the Farfallapter; better, isn't it? Then again, you can see how crudely the wing is linked with the body...

I guess I now no longer have any excuse to put off work on the 'Flying with...' page. It is probably also time to redesign the site. I have already looked at that, but the days where you could learn HTML in two evenings seem to have gone for good.

Sunday, April 24, 2011

Three years on

More than once in the three years I have been writing this blog I thought there were no more interesting speculative biology projects to be found on the internet, but each time I was wrong. Will the supply dry up? Perhaps not: there are more and more exquisitely detailed Z-Brush monsters, but mostly those are orcs, dragons and the like. In other words: they are not very interesting from a biological point of view. The reverse situation can also be found: well-thought out projects with artwork that does not do it justice. I guess I will simply have to wait and see how much content I can find to fill the 'allied matters' component of the blog. The number of page views slowly went up over time, which is rewarding.

So how about the 'Furahan biology' component? There is progress, if you account for the glacier-like advance of a very large project that you do not really have time for. Then again, in the last three years I got to grips with InDesign, Photoshop, Painter and XBrush (not that I am proficient in any). The most noteworthy skill I am trying to acquire is digital painting, which is the most needed one. I think I need to do some 10 additional illustrations of the "It's a fish" type, and then I will have some 15 two-page spreads to show to potential publishers. An example of those can be found in the New Hades book shop on the Furaha site: got to the brand new 'Living World Series' and you will find the 'Encyclopaedia of Furahan Wildlife' (also shown here). I aim to use that lay-out to present the book to publishers.


Rough tetropter animation; copyright Gert van Dijk

It is not difficult to think up many new animals or plants; many forms that I have now could do with some adaptive radiation. But my interest is mostly aroused by more complex puzzles. As an example I will explain the struggle to produce a good tetropter flight animation. The basic principles have been outlined before (start here to work back in time), but for good measure I have repeated an old animation above. As you can see the animal is shown from below, and the four wings move to and fro while rotating. They also move through one another, because the animation uses stiff planes for the wings: it is not good enough. I want a better one firstly, because I am curious: I wish to see what a spotted farfalloid looks like, when its beating wing reveal electric blue surfaces at one point in their cling and flap cycle, and bright orange ones the next! The second reason is that I would like to paint a variety of tetropters -talk about infinite variety-, and getting the perspective right of four warped surfaces in complex motion can be done by hand, but would be easier to manipulate by computer. I will break the problem into pieces:


Problem 1: defining movement
The wings can easily be modelled as surfaces in Matlab. These move through the wing cycle, meaning there are different requisitions for movement around the x- y and z-axes. To control them I wrote editing programs, now nearly done. The surfaces cannot remain simple planes throughout the movement cycle, but will have to be bent and warped. The animation above shows where I am now, meaning at the phase where all the 'warp factors' have to be tweaked to get it right. What you see here represents 'untweaked warping' though!

Problem 2: exporting the wings
The 3D program I am most familiar with is Vue Infinite. I had already written a program to convert Matlab patches to obj. files, which helps. But I then stumbled upon a new program, ad that was the imported wings for successive frames did not end up at the same spot in the scene. Apparently Vue calculates the mean of all x-, y- and z-coordinates to calculate the centre of an object, and if the object changes shape so does it centre. Well, I can counter that by shifting the object each frame to compensate. This needs work...

Click to enlarge; copyright Gert van Dijk

Problem 3: texturing the wings
Obviously, the wings will need interesting patterns on them as well as partial transparency. That, as well as bump maps, proved to be in the obj. definition and could be manipulated.
Here is a rough example of a warped wing with transparency and all in Vue.


So now you may understand why it has taken such a long time to put up a 'Flying with...' page, along the 'Walking with..' and 'Swimming with...' pages: the tetropter flight animation has to be ready first, and that is a big job.

Sunday, March 13, 2011

Hot Summer on Furaha

While thinking of new posts, I finally took some scenes I had prepared much earlier and assembled them. I have tried my hand at making animations before (here and here), but will stop doing so for a while. The program I used to to define plants (XFrog), does not allow for a full wind animation, and without that you cannot really animate natural scenes well. Vue Infinite, the program I used to render scenes, can in fact take care of moving foliage quite well, but its plant editor is sadly not open enough to allow me to define interesting alien plants. That is the main reason that this scene depicts a hot day: there is no wind at all. For fairly obvious reasons there are no animals to speak of, or at least none galloping through the landscape. You will need your imagination for that, I am afraid.

When an animation is lacking in movement it cannot work very well. Then again, I did like the way the 'time lapse' scenes came out, particularly the one in which you see the planet spinning during the night. The direction of movement of the stars (straight up) tells you that we are near the equator.

[Later addition: I guess I did not pay enough attention to logic. In the last scene you see the sun setting at a fairly low angle. If we would really have been near the equator, as suggested by the movement of the stars at night, the sun should dive towards the horizon at a more or less right angle...]


Anyway, here it is. There is a large ballont passing by, and look out, or rather, keep an ear out for splatterbugs at sunset.

There is a larger version on YouTube.


Sunday, November 14, 2010

Furaha Swamp Scene II


If this scene looks a bit familiar, that is because I posted previous versions of it as well, in November 2009. This version is updated though, and so is still worth viewing, or so I hope. The end is a bit rough: the 'Fish' is visible for a short while only, which is intentional, and so I thought I could get away with a limited amount of detail. There is a better quality version on the site: simply go to the plant page and select the arrox tree.

Click to enlarge; copyright plant image Gert van Dijk

Here is a short 'making of'. The plants were all designed with XFrog, a program aimed wholly at structures that branch and grow, i.e., plants. The various rules and settings can be quite complex, but it allows very good control over the characteristics of any plant you create with it. There are not many good plant editors about. One of the few other candidates is the plant editor inside Vue, but that is unfortunately geared towards changing and mutating existing plants, and does not allow the creation of a plant from scratch. Vue has the advantage that it allows its own plants to move in a breeze, which certainly adds to the liveliness of a scene.
The image above shows one of the flowering plants in the swamp scene, as it looks inside XFrog.

Click to enlarge

The next stage is to produce a suitable environment, for which I use Vue Infinite. Basically you start with a 'terrain', which in this case is the ground with some grooves in it to hold streams. Vue allows the user to define 'ecosystems' as collections of 3D objects that are placed according to rules. For instance, one such system could be limited to high points in the terrain. In this swamp scene the arrox trees only grow on such relatively high ground. The marsh growths, with reeds etc., are limited to medium height zones, while in this case hardly anything grows in the lowest ones. That is on purpose, as they would be obscured by muddy water anyway.
Once the playing filed is ready, the camera is set to fly through the scene, and to produce a ray-traced image 24 times a second, or more. A simple scene lasting 4 seconds may take about 10 hours, so a short film of one minute takes many nights of lonely processing (for the computer, that is; I will be asleep).
And then it is a matter of turning the individual frames into films, for which I use VirtualDub. The resulting clips are much too large to show on the internet so they have to be compressed, at the loss of quality. Adding sound and titles adds to the fun, for which I use Adobe's Premiere (Elements).

And there we are; a Furahan scene that does not actually look that alien. One reason for this is that plants may yield less obvious visual 'alienness' than animals. Regardless , I could not resist putting in an animal at the end. a specimen of a 'Fishes IV' species. I do not yet know how to make the parts of their body move, something that would add greatly to the visual quality of the film. But this is the level of my animation skills at present. I do not think that I will try to become good at it, as there is too little time for that.

Click to enlarge. From left to right, typical examples of species from the Fishes IV, V and VI groups. Copyright Gert van Dijk


But I guess that some of you will want to know more about the various 'Fishes', that are just called that by Furahan people because the word came easily, not because it is biologically correct. In this sense the early Horizonists seem to have gone for the old custom of labelling just about any type of water animal a 'Fish'. 'Crayfish' and 'starfish' come to mind as well. I will not go into the early development of Fishes I, II and II, that follow one another in geological time. Not so for Fishes IV, V and VI, shown above in a rough sketch. Here is a quote from an authoritative source, Nyoroge's "Broad Stokes":

"From this point on hexapod evolution becomes more complex. ‘Fishes III’ gave rise to three new groups, ‘Fishes IV, V and VI’, all of which had three pairs of fins. This has caused a great deal of confusion. There are two schools of thought trying to explain the ‘Fishes III Division’, as the debate has become known. The ‘Hexaphile School’ holds that Fishes IV, V and VI evolved separately from multifinned ancestors, and have three pairs of limbs in common, because three pairs of limbs are innately superior to any other number, without actually explaining in much detail why this should be the case. The ‘Monophyletic School’ contends that all three groups have three pairs simply because they all stem from a single ancestor. This is somewhat surprising in view of other differences between Fishes IV, V and VI, which do not suggest a common ancestry. The ‘Contingency View’, which has been gaining strength lately, holds that there is no innate advantage in any number of limbs, and that all three groups have the same number of limbs by accident. Molecular Cladisticians keep silent about the matter, due to a lack of clear evidence one way or the other."

Saturday, October 23, 2010

Epona Reconnaissance Flight (Epona V)

The Epona Project was, or perhaps is, probably the first serious attempt to build an fictional biosphere from scratch. There is still a website, definitely worth watching. Admittedly, the project has stopped in the sense that no new life forms have been developed for a long time, nor is that likely to happen. But the website is being added to, and I return to it from time to time. The last blog entry on Epona is to be found here, while another one that shows the same scene as is shown in the film below is right here. This time, I used Vue Infinite (version 7.5) to produce a film of almost one minute duration.

How does this work? Well, first of all, there were the life forms to consider. Steven Hanly had modelled them in the past, and it proved possible to port some of his models into the Vue environment. The 'uther' you see flying in the scene is entirely Stephen's doing. The plants could not be used directly, as present-day computer imagery requires more detail than was available when he first designed the models. They were therefore designed anew, using XFrog for the large leaves of the pagoda trees and for all small plants. The stems of the large pagoda tress were done in Vue Infinite. The trees were assembled in Vue, and Vue's 'ecosystem' feature was used to create a terrain with a stream running through it. Then just imagine that a 5-second fragment of film may need some 34 hours to render.

After that, a bit of sound was added, a process I have hardly any experience with. I hope the result is not too jarring.

Anyway, there we are: perhaps the film is about a robot drone taking a look on an Eponan archipelago, covered by a pagoda forest. There is a larger version on YouTube. The original film on my computer is much better; I wish I knew more about optimising quality while compressing a video...