Saturday, August 13, 2011

Create your own planet (using Celestia)

The theme of this first tutorial is how to produce image of a fictional planet of your own making. Personally I use two programs to do so: Celestia and Vue. Celestia was used to produce, among others, the 'satellite images' on my site. It allows you to explore the universe, and provides detailed images of just about any object in our solar system, shown with appropriate orbits, orbital speeds, etc. The program is driven by scripts that are completely open, meaning that anyone who wants to can change almost anything. The result of this is a lively community in which you will find all kinds of real rockets and artificial satellites, but also space ships and entire solar systems from science fiction. There is a 'motherlode' and a forum.


This tutorial aims at absolute beginners as far as Celestia is concerned, but you will need some experience with a suitable graphics program. At the very least you need to be able to paint, select areas and cut and paste them. Photoshop is an obvious candidate; I have used Paint Shop Pro in the past, and now also use Painter11. I am told GIMP is also good (and free...).


The planet Mars will be given a new surface, which, in the computer world, is a 'texture'. In its simplest form that is just a colour image, but additional trhcks include producing a 'bump map', allowing mountains or canyons to stick out or to be recessed, creating a more powerful 3D illusion. Another trick is adding a 'specular reflection map'. With it, areas such as seas and lakes will gleam when light falls on them, in contrast to duller areas such as land. Finally, planets can be draped in 'cloud maps', making them look like Earth.


Click to enlarge; copyright Gert van Dijk


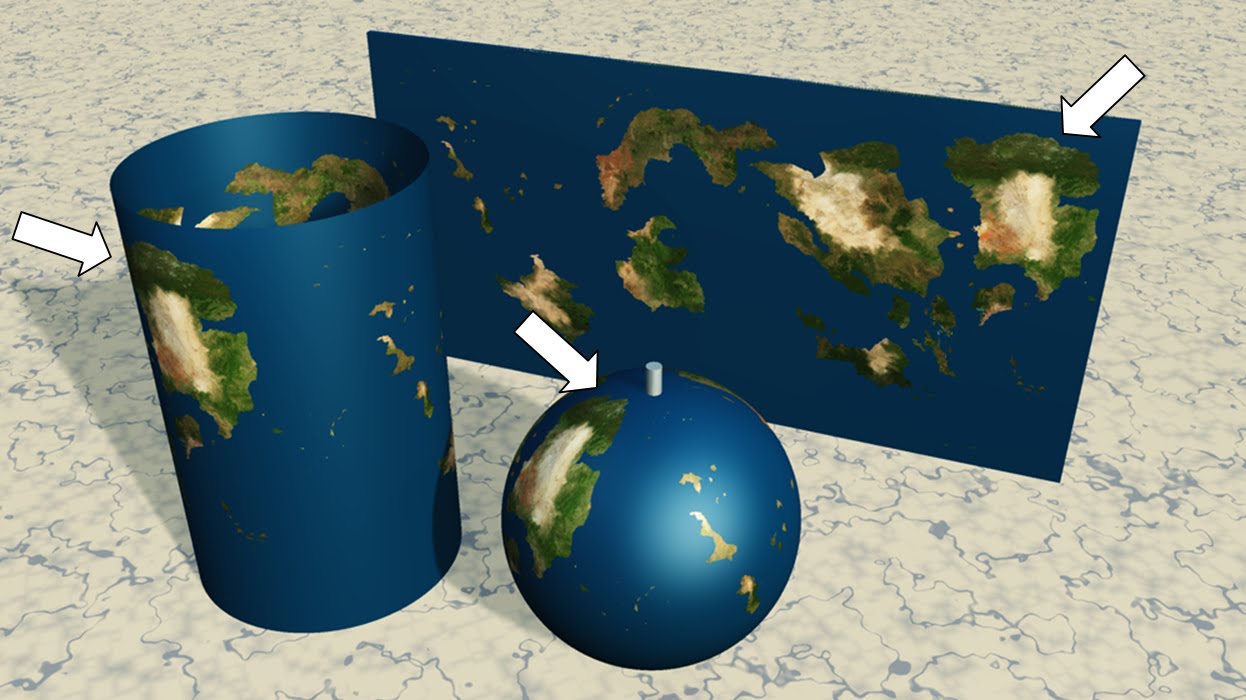
How do you design an interesting planet surface? Or, how do you draw the surface of a 3D sphere on a flat surface? By distorting it. Severely. The image above shows a sphere with a texture of the planet Furaha, along with a cylinder on which its surface is projected. Cutting the cylinder open produces the flat map in the back. Most distortion will occur around the poles, which is very visible in the image above. The arrows all point to the same part of the same continent. On the cylinder and the flat map that area looks much broader than it is on the sphere. The simplest way not get frustrated by polar distortion is to leave the poles featureless, achieved by filling it with sea.


The map above is twice as wide as it high; those are also the proportions used by Celestia, and they make good sense. The height of the map is the distance from the South to the North Pole across the surface, or half the circumference of the planet. Walking along the equator provides the entire circumference, ending up as the width of the map. This is about the simplest map projection there is, known as a 'Plate Carrée' projection. You should use sizes that are multiples of two, because Celestia wants you to. A good size for a blank map is an image of 1024x512 pixels. If ever you are ready for more, use 2048x1024 or multiples of that.


Click to enlarge; copyright Gert van Dijk


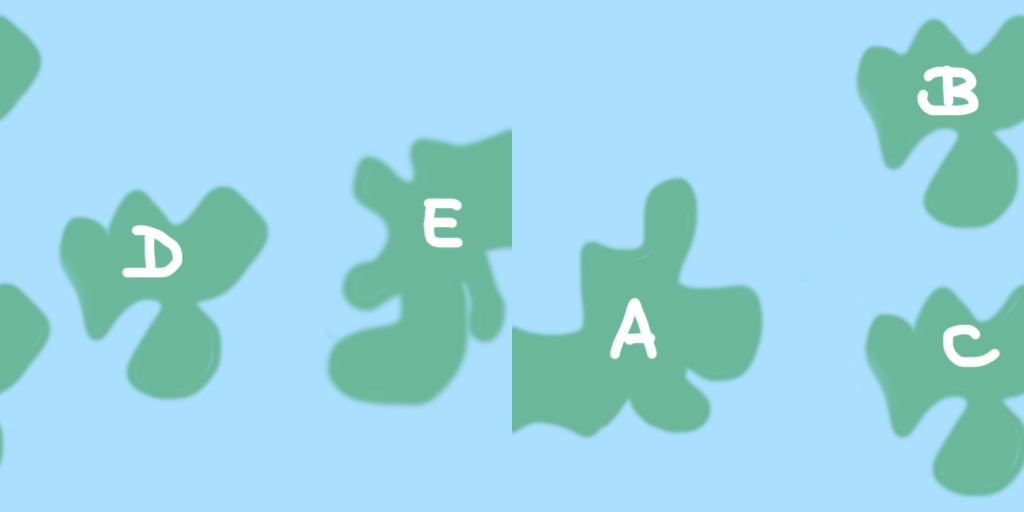
Here is a silly map of 1024x512 pixels with a few continents on it, labeled A to E. Note that B, C and D have the same shape. Let's cover Mars with it; you can download it from the above image, or make your own version (in which case it should be 1024x512 pixels!).


  1. Celestia should be on your computer. If not, download it and use it until you can at the very least find the planet Mars and get it into view.
  2. Close Celestia if it is open. Find the Celestia folder on your computer. Open it and locate the 'textures' folder. Within that is a 'medres' folder. It is filled with many planetary surfaces that you can study at will. Find the file 'mars.jpg' and have a look. It should be 1024x512 pixels. Save it, also in the 'medres' folder, but now as 'OLDmars.jpg' (in case you later want to replace your own planet with good old Mars).
  3. Now is the time to take either the silly image I provided or your own 1024x512 image. Save it in the Celestia medres folder under the name 'mars.jpg'. Don't use another size, don't use another name.
  4. Run Celestia and go to Mars. And there you are. Marvel and gloat.
Click to enlarge; copyright Gert van Dijk


You may note that there are some ridges and craters on your planet: those are the result of the bump map for Mars that is still in place. When you are ready marvelling it is time to stop gloating: the two sides do not match up. Continent A straddled the western edge of the map, and E the eastern one. Well, a map has edges, but a sphere hasn't. That simple fact tells you at the edges of the map are trouble areas. Remember that the flat map is a cylinder cut open, so the surface should be contiguous along the vertical seam. One way to do that is to use a featureless sea along the seam. But there is a better way. This boils down to cutting up the map in two halves: a western and an eastern one. Switch their positions, and the former edges now lie against one another at the centre of the image. Edit them to produce a nice continuous shape. How you cut the map into two halves depends on your graphics program. In Photoshop you can do the following (correct for CS5): Select Filter, then Other, then Offset; once there, check the box for 'wrap around' and fill in half the width of the image (which is 512) and press OK. That should do it.


Click to enlarge; copyright Gert van Dijk


Above are the results of first rearranging the squares and then editing the map. I chose to let the continents A and E fuse to form 'EA'. After you have worked on the centre of the map you can decide to revert the procedure and change the squares around again, also shown above. You can also decide not to bother, as both are equally correct.


There is a good chance that you will have noted that the continents B, C and D differed in shape on the globe, whereas they are the same on the map. The nearer the poles you get, the more pronounced the distortion is. It is extremely difficult to predict how a 2D shape will look like in 3D. The usual result is that shapes near poles tend to look pinched, i.e. many features will look like lines pointing to the pole, which is ugly and unrealistic. There are three solutions: as you may guess, the first is to fill the area with sea. The second is to muddle through: look at your latest version in Celestia and work on the flat map to correct pinching. Then save the latest effort as mars.jpg again, close Celestia, open it again as it otherwise does not refresh the map, and repeat. The third solution is the most elegant one, and requires that your graphics program can do a conversion from polar to rectangular coordinates as well as vice versa. Photoshop can do so (I learned this one from a tutorial on the Celestia forum). In Photoshop this transformation makes the rest of the map fuzzy, so it is best to use it with only part of your map:


- Select the top area of your map as above: the entire width, and roughly one quarter of the height.


- Copy this as a new image and jot down its size (for instance 1024x142, or 1024x199, etc). It should look like the one above.


- Transform this into a square of 1024x1024 pixels ('Image', then 'Image size', uncheck 'constrain proportions', change the vertical pixel size to 1024, OK).


- Go to: Filter; Effects; Distort; Polar; select 'rectangular to polar' and press 'OK'. This results in a new square image as if you are looking down at the pole. That is the top one of the two above. Edit it at will, resulting in something like the one above.

- When ready, all the steps should be reversed. First revert the polar distortion: go to Filter; Effects; Distort; Polar; select 'polar to rectangular' and press 'OK'

- Give the square its original rectangular size again, which you had jotted down (use the same route: image; image size, etc.)

- Select the entire rectangle and copy it to memory

- Go back to your world map and paste the edited polar area in your map in the right area at the top.

- If need be, merge layers so you can save it again as 'mars.jpg'


Click to enlarge; copyright Gert van Dijk


The map looks rather different now, and in Celestia there is no more polar pinching! For the south pole you can rotate the world map by 180 degrees so the south comes out on top.


If you can handle seams as well as prevent 'polar pinching', you are well on your way. I may need to do another tutorial on how to design suitable colour textures, bump maps and specular reflection maps. Do not forget that there is quite a bit of material on the Celestia Motherlode, on textures as well as on many other things.


Click to enlarge; copyright Gert van Dijk


Here is a picture made with Vue of the same globe. I added a bit of 'bump mapping' and some reflectivity. There is a free version of Vue 9 that hasn't got all all options, but you can definitely make images such as this one with it. Those who wish to experiment will find it here.


Click to enlarge; copyright Gert van Dijk


I prefer Celestia for imafes with a realistic astronomical view. For other illustrations Vue is nice; here is a model of Furaha with a colour map, bump mapping, with a grossly exaggerated height, and different reflectivity of sea and land areas.

Saturday, July 30, 2011

Ballonts under pressure (Ballonts IV)

The previous post dealt with the physics of balloons, with an eye on what it would take to design a viable animal using a lighter than air approach. The main thing that emerged, not very surprisingly, was what makes a balloon work is the difference in density between the gas inside it and the air outside it. It was also clear that balloons below a certain size do not even get off the ground; bigger is better for balloons. And that could raise difficulties, for how do big ballonts breed if not by producing little ones?

Click to enlarge; copyright Gert van Dijk

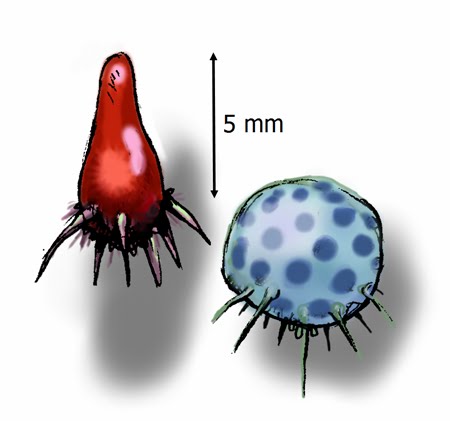
Seeing how small ballonts cause trouble, here's one painting in the Furaha collection with small ballonts. It was destined for oblivion regardless of whether the ballonts it showed could work. It was an early painting; the hexapod (Caeruleacornu rubrum) is much too insectile and I don't like the colours or the composition anymore. The 'balloon tree' (Mollum trisiphonitum) is a mixomorph making use of sunlight to create little hot spots in which interesting thermal reactions take place. That gave me a nice excuse to paint half-transparent bubbles, always a nice thing to do. Molla (that would be the plural of 'mollum') launch their young into the air in the form of a larvae suspended from a balloon sac. The adult mollum blows gases into the sac, forcing it upwards through one of its siphons. Once the sac pops free, a valve between the sac and the larva closes, and the larva drifts off into the wild blue yonder (or hither, as the case may be). The larva is supposed to crawl around a bit before becoming sessile for the rest of its life.

As you can see, the mollum contains some of the ideas mentioned in the comments on the previous post, such as using a ballont for just one stage on a being's life cycle, or having it produced by an adult. What it also shows is the kind of ballonts I would have liked to have, i.e. fairly small ones... Oh well; what remains to do now is to play around with all the factors in the ballont equation to see how we can get as big as body mass as possible with as little a sac as possible.

A thinner membrane
In the calculations the membrane consisted of a Mylar-like substance. The Mylar party balloons you see everywhere use metal to resist gases diffusing through the Mylar. Whether animals can do that as well is uncertain, but, as fishes face a similar problem with swim bladders, and their sealing method works. I looked at spider silk to see if that would be better, but its density is about the same as that of Mylar. I did not dare to make the membrane thinner than 0.1 mm, which I thought was stretching it already (sorry about that one...).

Change the gas in the balloon
The lighter a gas is inside a balloon, the better, and hydrogen is as light as it gets. About the only way to get less mass would be to heat the hydrogen: after all, hot air balloons float because one cubic meter of hot air weighs less that one cubic meter of colder air. Does heating hydrogen make a difference? The 'ideal gas law' nicely describes the relation between pressure, volume and temperature of a gas. After expanding the ballont model a little bit the model allowed a calculation how much mass of hydrogen could be saved to fill a balloon with a 1 meter radius for a range of temperatures. This is what came out: this hypothetical balloon could lift 4.8519 kg with the inside and outside both at 15 degrees centigrade. With hydrogen heated to 25 degrees less hydrogen was needed to get the same pressure and so the balloon could lift more: an additional 12.4 grams, to be precise.

What!? A bit more reflection clarified why this was so. A hot gas requires fewer molecules to exert the same pressure as a colder gas, and the differences in the amount of molecules needed determines the difference in mass, i.e. how much it lifts. But hydrogen weighs so little that the reduction doesn't amount to anything. It does if you are dealing with a heavier gas such as air. In air, there's not much point in using a hot hydrogen balloon. By the way, those designing their own ballonts should make certain that the bladder is filled with hydrogen only. Water vapour is much heavier than hydrogen, so the bladder should not be 'contaminated' with it!

Change the composition of the atmosphere
Adding heavy gases to your atmosphere will increase how much mass a ballont can lift. Earth air largely contains nitrogen and oxygen, but there are heavier gases. The real heavyweights are noble gases such as krypton (3.7 kg per cubic meter) and xenon (5.86 kg per cubic meter). Radon is even heavier but radioactive. You can dream about replacing half of the nitrogen in the Earths air by xenon: the density of the air would increase 2.4 times, and so would the lifting power of a hydrogen-filled ballont. The snag is of course that heavy elements are very rare in the universe, so such an atmosphere would make little sense. Some other gases might help, such as chlorine, sulfur dioxide or benzene. Large amounts of those would create a nice atmosphere for ballonts. Do not ask me to design a biochemistry to make such an atmosphere probable; I would not know.

Change atmospheric pressure
Another way is to increase atmospheric pressure. Gases can be squeezed, and the physics aren't complicated. Say a given volume of air on a planet X would have a mass of 1 kg; the same volume of hydrogen might have a mass of 0.1 kg. That leaves 0.9 kg to lift something with. Now we increase the pressure twofold. The same volume of air now masses 2 x 1 = 2 kg, and that volume of hydrogen masses 2 x 0.1 = 0.2 kg. The difference now is 1.8 kg, also doubled. So atmospheric density has a linear effect on liftable mass.

Click to enlarge; copyright Gert van Dijk

The graph above shows liftable mass; see the previous post for how that was arrived at. Start at the line for 1 atmosphere (that is Earth itself). If you increase the radius of your balloon, the liftable mass rises, and more so for as the radius increases. We knew that. Go to the next line, one for two atmospheres of pressure, and you get a similar curve. It is just higher.

Click to enlarge; copyright Gert van Dijk

The image above does something similar. It builds on the balloons in the previous post. Under '1 atm.' (that would be Earth) there are two balloons, one with a 0.5 meter radius and one with a 1 meter radius. Underneath are slung the bodies they can just lift. Now let's see what happens if we decide that we want balloons to lift these same bodies, but under a higher atmospheric pressure. The balloons get smaller, but not as much as you might think or wish. For instance, the balloon that had a one meter radius under one atmosphere of pressure can have a radius of 79 cm under two atmospheres of pressure (that radius defines a sphere with half the volume of the with a one meter radius - with twice the density, the mass is the same; see?).

No matter what you do, that third power effect of radius conspires against having small ballonts. I think that I will delve into the possibilities of atmospheres with hundreds of times the pressure of Earth in a later post. That should do justice to 'Jovian floaters'; in the New Hades bookshop you will find that they were supposed to be so common in every gar giant as to be boring. We'll see.

You can of course keep on increasing atmospheric pressures even on a terrestrial planet, but there will be consequences; there always are. Think of wind forces, think of hothouse effects; there are probably lots of other effects. One is 'drag', or the force that resists moving through fluids or gases. If you want a ballont to move against the wind, you will want as small a bladder as possible to reduce drag. With an enormous bladder all a ballont can do is float with the wind, against which resistance would be futile. In a dense atmosphere the bladder would be smaller, making a self-propelled ballont more feasible. But drag also increases with density; as I said, there are always complications, even in a simple Newtonian universe.

In the past I had worked on the physics of ballonts a bit but not in detail. Those earlier efforts had made me settle on a pressure of about two earth atmospheres for Furaha. Two atmospheres is about what you get with a depth of 10 meters of water on Earth. Human bodies can adapt to that, as evidenced by underwater habitats. I did not dare, then or now, to go higher for fear of the consequences. What the current more detailed analysis yields is that smaller ballonts are, how to put it, exempt from existence.

But large ballonts will stay, at least for now. How Furahan ballonts breed and what their evolutionary history is are things that need quite a bit of reflection. I would not be surprised if regular commenters solve these issues long before I ever get round to them...

Friday, July 15, 2011

Ballooning animals and Newtonian fitness (Ballonts III)

Click to enlarge; copyright Gert van Dijk

I have always had a weakness for balloon animals. Not the toy balloons that squeak when you twist them into shape, but lighter-than-air living beings. I would like to see such 'ballonts' float silently and majestically over the plains. One such is shown above (well, two of them). Nice, isn't it? I could do screensavers if anyone wants them.

Click to enlarge; copyright Gert van Dijk

Smaller ballonts, less than a meter, are even more to my taste. These might descend from a rain forest canopy to siphon fluids from carcasses, or something equally mysterious. No wind there, so it might be a good environment for them. They could flap around a bit as well.

Click to enlarge; copyright Gert van Dijk

Less dramatic but much more common would be tiny ballooning seeds drifting with the wind across the world, forming a sort of aerial plankton. Books on biomechanics never mention lighter-than-air flight, but do not discuss radial flight either, as neither exists on Earth. The usual question is whether the absence of lighter-than-air animals on Earth signifies that evolution so far forgot to take off in this direction or that the idea won't fly.

I have written about ballonts before (mostly here and here), but this time the focus will lie on 'hard science', so there will be some formulae and a few calculations. Sorry about that, but it is not really difficult. The goal is to see what is needed to achieve a ballont that can lift a nice hefty body with as small a gas bladder as possible. Because there is a bit of explaining to do we will not get further than Earth in this post.

The first step is to realise that floating in air works exactly the same as floating in water. As 'buoyancy' you will find that in biomechanics textbooks (for instance here and here). It all starts with Archimedes' principle, who stated that 'the upwards force of an object in water equals the weight of the displaced volume of water'. That works in air too, but let's start with water, because that is a bit more intuitive.
  • Archimedes started with 'the displaced volume of water'. OK; let's make a box of 20 by 20 by 20 cm and hold it under water. It is not difficult to find the volume of the water it displaces: that is the volume of the box itself, which is 0.2 x 0.2 x 0.2 = 0.008 cubic meters.
  • To get weight we first need to know what the mass of that amount of water is. The density of fresh water is 1000 kg per cubic meter (sea water is a bit denser). For 0.008 cubic meter, we get a mass of 0.008x1000= 8 kg.
  • Weight is a force, not a mass. It is the product of mass with the gravity constant g, and on earth that is 9.8 m/(s^2). So the upwards force acting on our box is 9.8x8= 78.4 Newton.
Upward force = g x Density of water x Volume of object

Nice, but so what? Well, the presence of g in the formula means that the upward force increases directly with gravity. On a world with twice the gravity of Earth the upwards force will be twice as large as on Earth. One consequence of this is that a floating object rises faster than on Earth. But will it also lift a larger body mass, which is what we want? As we will see, the answer is no, but first we have to calculate how much mass a balloon can lift. The first step to get there is to calculate the object's own weight. We know how to calculate weight: upwards force was weight of water, after all:

object weight = g x Density of object x Volume of object

The net force is obtained by subtracting them, which can be written as follows:

net force= g x (Density of water - Density of object) x Volume of object

The gravity constant g is still in there, but focus on the rest of the formula. If the object is denser than water the net force is downwards -it sinks- and if the object is less dense, it will float. No matter what you do to g, that balance will not change. Interesting; the amount of mass that can be lifted does not depend on gravity. Without g, the formula describes a mass (density times volume). For a net upwards force, that resulting mass is what the object can lift:

liftable mass= (Density of water - Density of object) x Volume of object

Here is an example: Suppose the object is made of cork with a density of 250 kg/cubic meter. Fill in the numbers for cork and fresh water and you get (1000-250) x 0.0008 = 6 kg. If you tie a mass of 6 kg from the cork cube, the ensemble would just stay in place under water, as its combined density now is the same as that of water. (1) All we need to do to turn this into a formula for the bladder of a ballont in air is to supplant 'water' with 'air', and 'object' with 'bladder':

liftable mass= (Density of air - Density of bladder) x Volume of bladder

The density of air on earth at sea level is only about 1.2 kg per cubic meter, so we need very light materials to make a ballont work. The choices are limited. Helium would be great, but it is probably difficult to find on a terrestrial planet, and concocting a biochemistry to produce helium may be taking things too far. Hydrogen is easy to find, can be fabricated, and only weighs 0.09 kg per cubic meter. We are now almost ready for the real stuff.

Click to enlarge; copyright Gert van Dijk

The image above shows a simple ballont scheme. It builds on the scheme above. Here are the ingredients, supposed to work at one Earth atmosphere and 20 degrees centigrade:
  • A spherical bladder. It consists of a membrane, which will weigh something. I have great faith in the ability of Darwinian evolution to come up with amazing substances, so I chose something like Mylar. The membrane will be just 0.1 mm thick, and its density is 1.2 times that of water, based on PET and similar substances. The radius of the sphere allows its area to be calculated, and with that its mass. That is a downwards force.
  • The bladder contains hydrogen gas. Its radius gives us its volume, and together with the density of hydrogen (0.084 kg/(m^3) at about 20 degrees) we get the mass of the hydrogen. This is another downwards force.
  • The volume of the displaced air is found from the radius of the bladder and the density of air (1.2 kg/(m^3)). This is an upwards effect.
Subtract the two downwards effects from the one upwards one. What we have left is how much mass the bladder can lift. We will tie a body underneath with a density of 1.1 times that of water. (2)

Click to enlarge; Copyright Gert van Dijk

Click to enlarge; copyright Gert van Dijk

The graph above shows results for bladders of 0.1 to 1 meter radius. The blur line (displaced air) is what determines the upwards force, and the membrane (black) and the hydrogen (green) pull downward. The red line is the difference, and that determines the mass of a body you can suspend from the bladder. Hm; a balloon with a radius of one meter still only lifts about 3 kg, as shown in the image below the graph (the man is a 3D object I found on the internet). While 3 kg is enough to build an interesting animal -think of a cat!- the relative sizes of the bladder and the body mass are not pleasing. Even if we clap on some wings to the body, the animal will still be extremely vulnerable to the slightest wind. It does not even get close to the kind of animal we want. I think we need to do better. Even a protoballont should have some advantage of its bladder, or else Darwinian evolution will not take off.

Click to enlarge; copyright Gert van Dijk

Perhaps the ballont seedlings work better, so let's do the job for a radius of up to 40 cm. Hang on: the red line goes below zero, so the smaller ones cannot lift anything at all! The reason is that their membrane is too heavy at small sizes. On further reflection that is understandable: the mass of the membrane increases with the square of the radius, and lifting ability (volume) with the third power. For very small ballonts, the membrane can outweigh the lifting power! Alas, there go the balloon seedlings. Struck down, not by a lack of Darwinian fitness, but because they are unfit in a Newtonian universe.


Click to enlarge; copyright Gert van Dijk

Let's try again for balloons with a radius of 1 to 5 meter. That's better: we can lift hundreds of kg now, enough for an impressive animal, with limbs, a digestive system, a hydrogen-producing organ (however that works), tentacles for tethering and grasping food, etc.. You may protest that the membrane is too flimsy for an animal of this size. I agree, but even with a thicker membrane, compartments etc., the effect of the third power of volume will easily priduce a net lifting force. Unfortunately, a balloon with a 5 meter radius is still very large indeed, nowhere near the shape we were looking for....

So it is the density difference of the lifting gas compared to the surrounding air that makes a balloon work. Perhaps surprisingly, gravity does not determine the liftable mass, or, at any rate, not directly. Some elements scale with the square of the radius and others with the third power. We saw earlier that this limits the size of land animals (start here for that subject). For ballonts it is just the opposite: bigger is better, at least as far as liftable mass is concerned. Whether the animal is viable in the Darwinian sense is something else entirely. Earth is a poor place for ballonts: blame Newton. To get them to work we need to manipulate not the ballont, but the planet! More on that in the future.

(1) In reality, the object you tie underneath the object also has both weight and an upwards force. The figure of 6 kg holds for the mass difference between the two.
(2) The body also displaces a bit of air, but that has so little mass we will ignore its upwards force.

Saturday, July 2, 2011

Purple Plasmid's Fentil

As confusing titles go, this one must achieve a fairly high score. What it means is that there a fictional moon Fentil, designed by someone named Purple Plasmid, who in real life goes under the name of Dan Emmerson. You will find his personal page on Deviant Art here, and his page on the planet Fentil right here.

If you, like me, are on the lookout for interesting projects on speculative biology, Deviant Art is not a bad place to search: it has enormous numbers of images and they are usually labelled sufficiently clearly to find what you are looking for. Some images of exobiological animals are very good, but quite often there is just one, and I much prefer a collection, a background story, or, in other words, more than just one image. Fentil has both background information and a collection of images, and so fits the bill nicely. There are over 60 images: some maps, some sketches, and some more elaborate designs. Dan's work exudes enthusiasm. Let's have a look.


Click to enlarge; copyright Dan Emmerson

These are 'pump fish', whose bodies are essentially cylindrical. They propel themselves by pumping water through heart-like chambers arranged one after the other, as the image shows. I like that design; that in itself is not surprising, as it is very much like some of my own designs that swim using peristaltic pumps (look for them on the water page, under 'swimming with tubes', or directly here if you do not mind losing the menu structure). I never named my own beasties, something I should rectify. One day I might actually just do that... Anyway, like my own creatures, pump fish probably do not show much movement on the outside when they are moving around. I started to wonder how many of these pumps should be placed one after another. For my 'peristaltic tube swimmers' I reasoned that one cycle moving along the length of the tube would be enough. In the pump fish case, you can see that the last segment is narrower than the front ones. If the same volume leaves the animal at the back as goes into the front in the same time, but through a smaller opening, the velocity of water must be higher, providing more propulsion. Do the successive chambers work at higher pressures, and is that the reason there are several?

Click to enlarge; copyright Dan Emmerson

I like the design of this 'sea sparrow': an elegant shape that seems very workable. They remind me of some sea slugs on Earth. The slug I had in mind is right here, and if you like sea slugs do not forget to have a look at the rest of the site they appear on. An intriguing part of the sea sparrow's anatomy is the combination of several paired fins with a large unpaired one at the back, giving it very original appearance. I would very much like to see an animation of how it moves.


Click to enlarge; copyright Dan Emmerson

A 'spot of fishing'. More precisely, it is a 'Rorschach sea sparrow' catching a pump fish. The accompanying text states that sea sparrows can fly and also chase their prey underwater. Gannets combine swimming and flying on Earth, although they are much better at flying in air than at swimming underwater. I suppose that it is possible to shift the point where an animal is at its best.
Dan's style with its flat colours and clear lines reminds me of some 'bandes dessinées' that use the 'ligne claire', such as shown here. I like this particular style. While seemingly simple, appearances are deceptive here. Dan wrote me he uses Flash for his artwork.


Click to enlarge; copyright Dan Emmerson

What you see here are some Fentil 'cloverheads' in the act of laying eggs. Cloverheads are herbivores that travel in great herds across vast plains. There are various cloverheads to be found on the Fentil section of Deviant Art. They all remind me a bit of Barlowe's animals, particularly as regards their feet, thatall look like elephant or sauropod feet. I think that this type of feet is very out of place in a fast-moving animal, but the explanation for that will have to wait for a post on what toes are good for.
What you might not appreciate is that you are looking at a first: this image had only been published before as a work in progress, but now it is final. A scoop for 'Furahan Biology and Allied Matters'!

Click to enlarge; copyright Dan Emmerson

These are 'Bghelly baskets'. These animals use sunlight to help raise temperatures in their gut sacs, which is a nice idea. They are larval forms using echo-location. Again I find the clean design very appealing.


Click to enlarge; copyright Dan Emmerson

Bone trees: without doubt they are among the most alien of Purple Plasmid's inventions. I would love to see a landscape painting with lots of them. The text provides a factual and neutral description about how they grow they way they do, but not why they do so.
Most plants on Earth have an enormous surface area in relation to their volumes, what with all the flat leaves and slender branches and twigs. Cactuses are notable exceptions: with their rotund shapes and no leaves to speak of, they clearly went for a very low surface-to-volume ratio. It is not difficult to work out why a cactus has a shape different from almost all other plants: a small area restricts evaporation, and their environment is very light anyway. As a bonus the large volume allows reserve water to be stored. Bone trees may look like cactuses, but they are found in regions where fresh water is plentiful, so there must be something else going on.
I thought that it might have to do with their skeletons being brittle, but Dan assured me that that was not the case. Instead, Fentil orbits a planet and suffers from frequent eclipses and the attending drop of temperature. This is what he wrote: "During this time, most plants hide within a protective shell, or retract their leaves (bone trees pull their leaves back into their shells) or just re-absorb the valuable photosynthetic tissue, which is usually free-floating in a transparent gel."


Click to enlarge; copyright Dan Emmerson

As hinted in the image above, There may very well be a website about Fentil in the future -another scoop!-, allowing visitors to click on cladistic trees to see what kind of animals they are dealing with. That sounds like a excellent idea. I hope Dan gets around to building one.